
Contents
– Focus on the need to bleed motorbike brake fluid
– Step 1: Locate the bleeders
– Step 2: Case 1: Replace the brake fluid
– Case 2: Put your motorbike’s empty system back into service
It is recommended to replace the brake fluid of your motorbike every 2 years. The operation is not complicated, but it requires much attention to let air into the system. Brakes are safety devices, and any mistake can have serious consequences!
Here is a step-by-step guide on bleeding the brake fluid from a motorbike.
The need to bleed the brake fluid from a motorbike
Brake fluid is a hydraulic fluid that transmits the movement of the brake lever or pedal to the pistons of the callipers. It is incompressible and circulates in a sealed unit. The most commonly used is called DOT4, but there is also DOT5.1 (used in racing) and mineral fluid (used for bicycles and some older vehicles).
DOT4 is hydrophilic. Over time, moisture can enter the system. This impacts braking (loss of precision and risk of blocking). During braking, the heat generated by the brakes increases the temperature of the fluid, allowing the moisture in the fluid to vaporise.
Caution: brake fluid is corrosive to paintwork and transparent plastics (dashboard glass) if it is not wiped off quickly. Remember to protect your motorbike with rags.
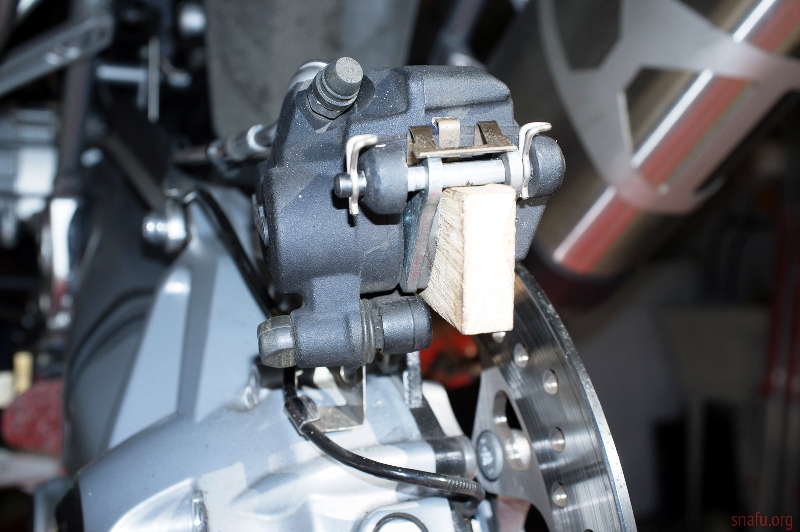
1. Locate the bleeders
Every brake calliper has at least one bleeder. This is located at the highest point of the calliper. Some callipers have 2 bleeders (1 per side). In this case, start bleeding with the one closest to the brake hose.
Particular case: the Combinated Brake System (CBS), specific to certain Honda models, has a brake distribution on both wheels when only one of the controls is used. The callipers accept 2 hoses that do not interact, requiring 2 bleeders located on the same side but at different heights.
The bleeder must be positioned upwards so that the air in the calliper escapes when bleeding. If this is not the case, dismantle the bracket and place it correctly.
2. Case 1: Replace the brake fluid
If you only want to replace old fluid with new, do not drain the system:
– Empty the master cylinder fluid reservoir with a syringe, and clean the inside of the reservoir with a cloth.
– Then, place a clear hose on the end of the bleeder and connect the other end to the (empty) syringe.
– Fill the fluid reservoir with suitable new fluid from a recently opened container.
Caution: Be careful not to press the lever or pedal when the reservoir is empty to prevent air from entering the system. New fluid displaces old fluid, and the absence of air makes bleeding easier. The lighter colour of the new fluid coming out of the bleeder indicates that the fluid is completely replaced.
Proceed as follows:
– Using an open-end spanner, loosen the relevant bleeder by about 1/4 turn.
– Press the lever on the relevant brake to release fluid and retighten the bleeder, keeping the lever pressed down.
– Then, release the lever and repeat the operation until the fluid comes out clean.
– Then move on to the next bracket if necessary.
Good to know: start with the calliper with the shortest hose length with the master cylinder. Be careful: when the lever is released, the system is depressurised, and the bleeder sucks, which would cause the liquid expelled in the calliper to return. In addition, a loose trap is not airtight, and air can enter through the threads when the pressure is released.
– Watch the fluid level in the master cylinder reservoir. The fluid level drops each time you release the pressure, and if you forget, air will enter the system.
– Once the fluid has been replaced and you are sure that no air bubbles remain in the system, top up the reservoir and close the reservoir, taking care to position the rubber membrane correctly.
Case 2: Putting your motorbike’s empty system back into service
There are several reasons to empty the circuit:
– repair of the brake calliper seals;
– rebuilding the master cylinder;
– replacement of the hoses or a component.
Bleed the brake fluid
Note: Most original master cylinders are not fitted with bleeders, so getting the fluid into the system can be a hassle.
To make bleeding easier:
– Remove the calliper bleeders and wrap the threads with sealing tape (Teflon) so that you can suck with the syringe when opening. The vacuum created in the circuit facilitates the entry of the fluid.
– Once the master cylinder has been primed, press the brake lever to release fluid and tighten the bleeder by holding the lever down.
– Then, release the lever and repeat the operation until the system is drained.
Front brake peculiarities
The piston of the master cylinder is a cast and partially machined part. The moulded part often has rough edges where small bubbles can be trapped. These bubbles do not prevent the brake from working, but they lengthen the lever’s dead travel before the system builds up pressure.
To get rid of these bubbles: tap the lever with the handle of a hammer or screwdriver, or by hand by pulling it slightly and releasing it suddenly, aiming to make the lever “resonate”. This has the effect of transmitting vibrations to the master cylinder and thus causing the bubbles to rise in the cylinder tank. They can be seen escaping through one of the small holes.
As they do so, the clearance will decrease. These bubbles cannot escape through the callipers because the volume of liquid displaced is insufficient for them to travel through the hose (so as soon as the pressure is released, they come back up).
Note: this phenomenon may occur several hours after bleeding. In this case, proceed in the same way as described above, without disassembling anything but ensuring that the master cylinder is as horizontal as possible.
1 comment
[…] more: – Bleeding Brake Fluid From a Motorbike; – 5 Steps to Repaint Your Motorbike […]